Device Driver Properties

Contents
The properties of device driver contain the following tabs of information.
Note: Contact NetBrain Support Team first before you make any changes in the following tabs.
Live Access Tab
The Live Access tab is used to define how to log into a device and commands to send in different modes.
Property |
Description |
SNMP port |
The SNMP port to access a device. |
Telnet port |
The telnet port to access a device. |
SSH port |
The SSH port to access a device. |
Device CPU/Memory Usage OID |
The OIDs used for monitoring CPU and memory usage of a device. |
Multi page prompt |
The prompt to display the next line/screen of output. By default, the prompt is "--more--". |
The command to exit |
The command used to exit from the current command mode to the next highest command mode. |
Yes/No prompt string |
A prompt string to confirm or cancel. |
Interval to pause before entering password |
The time in milliseconds that the system waits before entering the password. |
Invalid return |
Determine whether a command return is invalid. ▪If the number of characters contained in the show command result is larger than the specified value (180 by default), the result will be treated as valid. ▪If the number of characters contained in the show command result is less than or equal to the specified value (180 by default), the system will further check whether the returned result contains the specified keywords. If yes, it will be recognized as an invalid result, indicating that it is failed to execute the command. |
Standard login process |
The command (such as enable) to enter the privileged mode and the command (such as terminal length 0) to stop the CLI paging. |
Customized login script |
Used Customized CLI Login Modes and Scripts to access a device. |
Config File Tab
The Config File tab is used to specify how the system retrieves and parses the configuration file. The system uses both SNMP and CLI commands to build configuration files. When discovering a device, the system will firstly use SNMP to retrieve its hostname, vendor, and model information, and then try to enter the non-privilege and privileged mode to obtain its full configurations file with the CLI commands. If the CLI commands works, then the contents obtained via SNMP will be overwritten. Therefore both of the methods are selected by default.
Category |
Property |
Description |
Retrieve configuration file by CLI command |
CLI Command |
The CLI commands used to retrieve configuration files, such as show run. |
Identify device type and driver by keywords in config file |
The keywords in the configuration file to identify the device type and driver of the device. |
|
Transform config file to known format by |
If you specify an existing driver for a new device type, the format of the configuration file to be parsed might be different from an existing configuration file in the system. Use either way to transform the configuration file into a known format. ▪Replacing equivalent keywords — Enter the keyword used in the new format of the configuration file in the Keyword column, and enter the known keyword used in the existing format of the configuration file that the system can parse in the Known equivalent keyword column. When the system uses the driver to parse the new configuration file, it will first replace the keywords in the configuration file with the equivalent keywords configured in this table. ▪Python Script — select the python script and design a parser to translate the keywords to a known format. |
|
Parse transformed config file via |
Select a device driver or the above python script to parse the transformed configuration file. |
|
Use SNMP to Build Device or Build Configuration File |
Use SNMP to build configuration file |
Use either way to retrieve configuration file to build the device model. ▪Use MBI-2 OID ▪Use Customized OID |
Use SNMP to build device |
Define python scripts to retrieve data, build a data model for a device and finally add the device to a domain. |
|
Define comparison logic |
1.Enter the number in the Skip from top field to specify which lines can be skipped during the comparison. The lines are counted from the top of the configuration files. 2.Enter the regular expressions in the Option field to specify which lines can be ignored during the comparison. |
|
Table Tab
This Table tab is used to specify how the system retrieves and parses Route Table, MAC Table, ARP Table, NDP Table, BGP Route Table and NCT (Network Control Table). By default, the system retrieves these data tables via SNMP and you can also set to retrieve them by executing CLI commands.
Note: The JSON sub-tab is used to define the NCT to retrieve and the NCT sub-tab is used to define the way to parse to a specific NCT table.
Take Route Table for example:
Category |
Description |
Retrieve route table by CLI command Up to pages |
The maximum route table pages that the system can retrieve. The default value is 500. If the route table pages exceed the limit, the system will discard the exceeded pages. ▪CLI command for global route table — enter a CLI command to retrieve global routing tables, such as show ip route. ▪CLI command for VRF route table — enter a CLI command to retrieve VRF route tables, such as show ip route vrf $VrfName. ▪Parse CLI route table by script — enter script to retrieve and parse route tables. |
Build route entry by SNMP |
Calculate live path and retrieve routing table entries via SNMP. ▪Use MIB-2 route default — use the route MIB files to retrieve route tables. ▪Use MIB-2 forwarding MIB — use the forwarding MIB files to retrieve route tables. ▪Customized script — define a Python script to retrieve route tables. ▪Max number of rows in route table — limit the size of route entries that can be retrieved. |
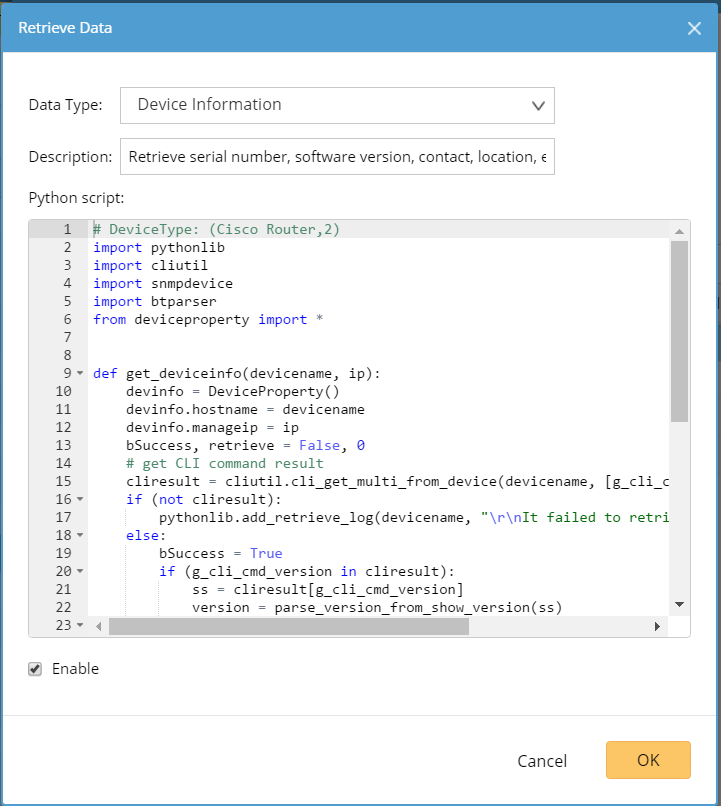
Advanced Tab
The Advanced tab specifies the python scripts used to retrieve device information (such as serial number, and software version) and interface data (such as interface speed, and duplex) of the same device type.
Configuring Multiple CLI Modes and Prompts
When the built-in two modes or their login prompts cannot fit your network devices, you can add more CLI modes or configure the login prompts of built-in modes in the driver for a specific device type.
Note: When multiple CLI modes are defined in a driver, the system polls them from top to bottom during the live access to a device until addressing the matching one.
1.In the Device Driver Properties dialog, click the Live Access tab.
2.In the Login Process Settings field, check the Customized login script radio box.
3.To customize prompts and commands for a specific mode, directly go to step 4; if a device type requires multiple CLI modes besides the built-in Non-privilege Mode and Privilege Mode, click Add Mode and then continue with step 4.
4.Configure the prompts and commands for a specific mode. Take Non-privilege Mode as an example.
1)Move your mouse pointer to the Non-privilege Mode entry, click the drop-down icon ![]() and select Edit.
and select Edit.
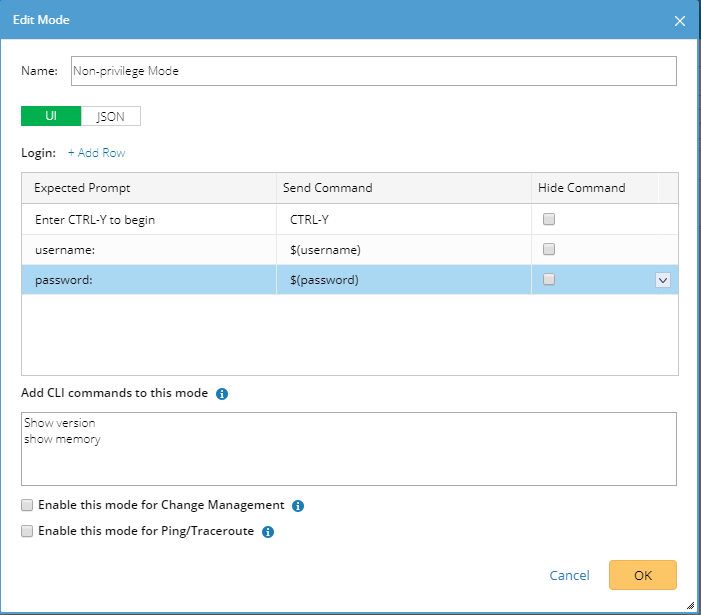
2)In the Edit Mode dialog, add prompts and commands by either of the following ways:
▪Add prompts and commands in text.
▪Add prompts and commands using JSON script.
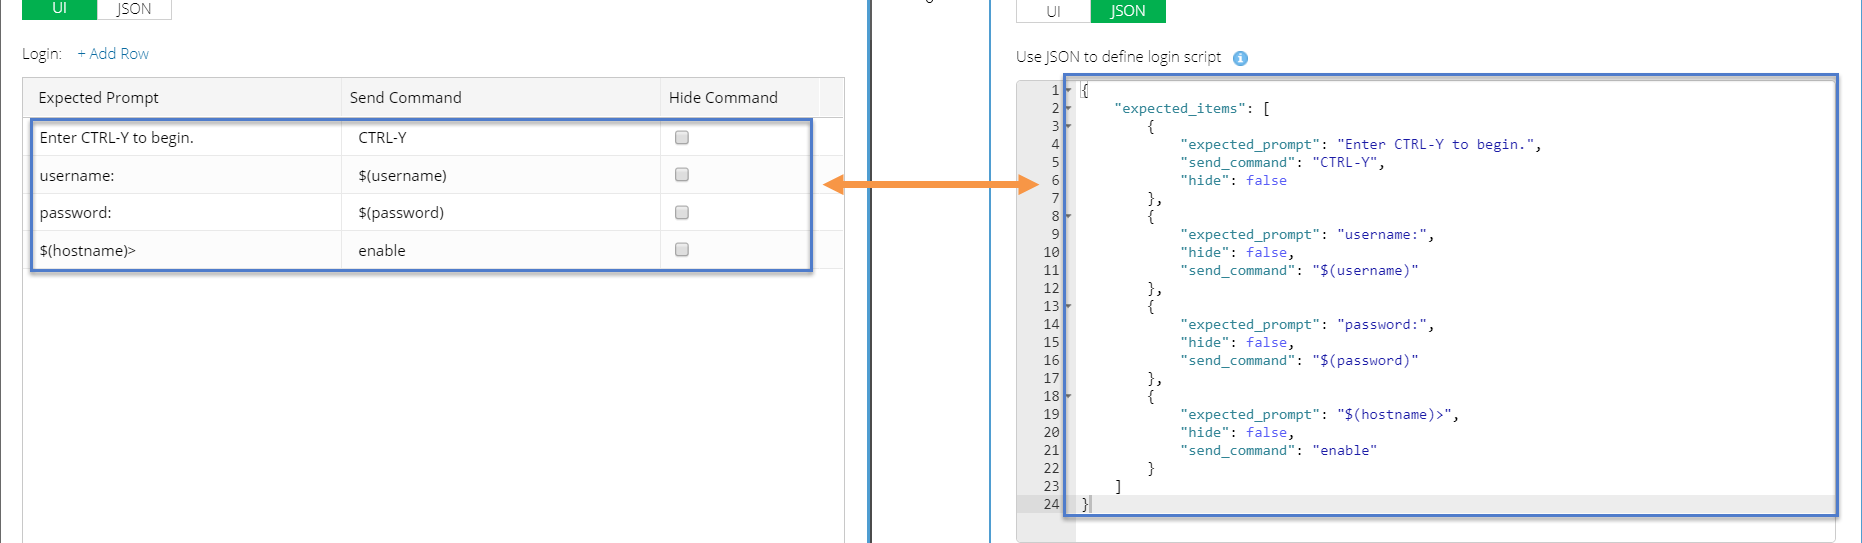
Note: The content defined on the UI tab and JSON tab is synchronized with each other. Therefore, you can select either way to define prompts and commands for only once.
3)In the Add CLI commands to this mode field, enter the commands that can be executed in this mode.
4)Click OK.
Adding Prompts and Commands in Text
On the UI tab, click Add Row to add a new pair of prompt and command..
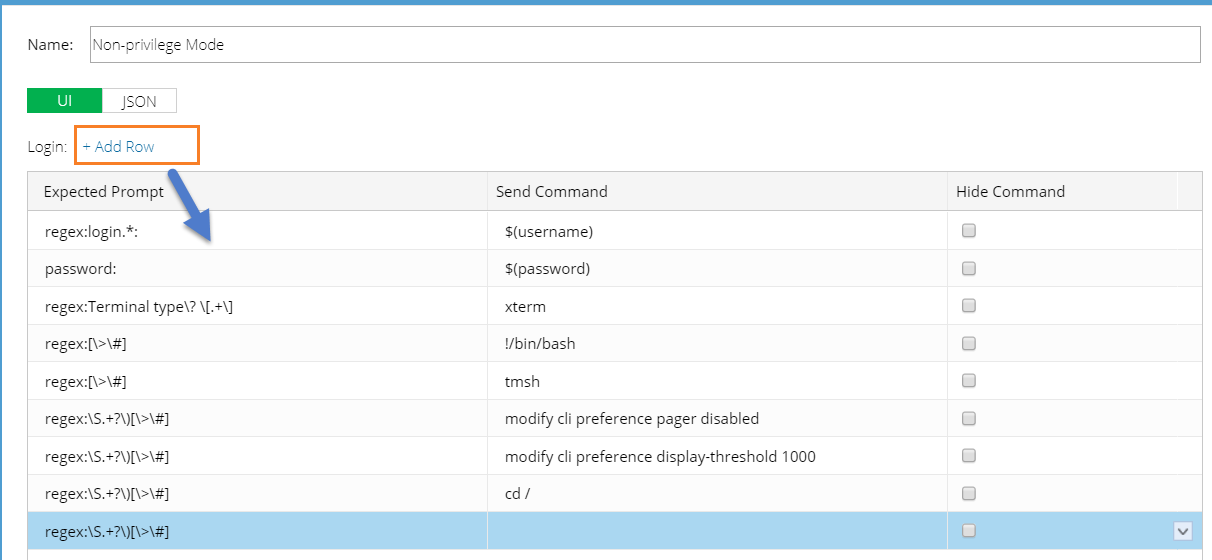
The definition contains three fields:
Field |
Description |
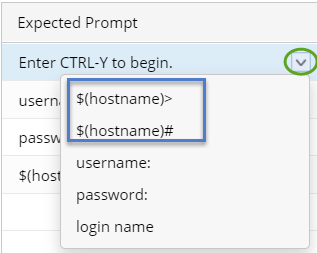
Expected Prompt |
A prompt to require a command input to continue the login process, such as the prompt Enter CTRL-Y to begin that you may encounter when logging to some Avaya switches. ▪The input supports text, such as Enter CTRL-Y to begin, and regex expression, such as regex:.+?to +begin.+. ▪The input supports the variable $(hostname), such as $(hostname)> and $(hostname)#. Note: The prompt cannot be empty and cannot exceed 255 characters. |
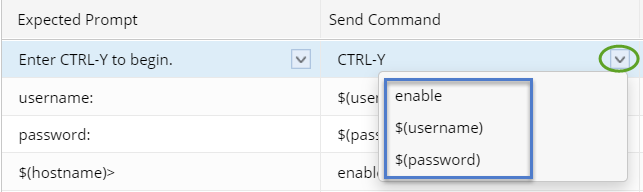
Send Command |
The corresponding command that the system sends out after receiving an expected prompt. ▪Besides common commands such as enable, exit and end, the system supports sending a key or combination keys on your keyboard to a device. See Supported Key and Combination Key Commands for details. ▪The system supports the following variables in the command input: o$(username) — the non-privileged username of a device. o$(password) — the non-privileged password of a device. o$(privilege username) — the privileged username of a device. o$(privilege password) — the privileged password of a device. Note: The command cannot be empty and cannot exceed 255 characters. |
Hide Command |
Show the content in the Send Command column as ciphertexts. |
Adding Prompts and Commands Using JSON
On the JSON tab, configure the prompts and commands by using JSON scripts. The JSON definition contains the following elements:
Element |
Type |
Description |
expected_Items |
Array |
A collection of all matched items in the script. |
expected_prompt |
string |
A prompt to indicate a command input to continue the login process, such as the prompt Enter CTRL-Y to begin that you may meet when logging to some Avaya switches. ▪The input is a string that supports the regex expression, such as "regex:[\>\#]". Note: About special characters such as \,',r in the regex expression, you need to add escape characters ahead of them in JSON. For more details about JSON character escaping, see JSON RFC document. ▪The input string supports the variable $(hostname, such as "$(hostname)>". Note: The prompt cannot be empty and cannot exceed 255 characters. |
send_command |
string |
The corresponding command to send after receiving an expected prompt. ▪Besides common commands such as enable, exit and end, the system supports sending a key or combination keys on your keyboard to a device. See Supported Key and Combination Key Commands for details. ▪The system supports the following variables in the command input: o$(username) — the non-privileged username of a device. o$(password) — the non-privileged password of a device. o$(privilege username) — the privileged username of a device. o$(privilege password) — the privileged password of a device. Note: The command cannot be empty and cannot exceed 255 characters. |
hide |
bool |
Determine whether to show the content in the Send Command column. |
Sample JSON Script:
{
"expected_items": [
{
"expected_prompt": "regex:login.*:",
"send_command": "$(username)",
"hide": false
},
{
"expected_prompt": "password:",
"send_command": "$(password)",
"hide": false
},
{
"expected_prompt": "regex:Terminal type\\? \\[.+\\]",
"send_command": "xterm",
"hide": false
},
{
"expected_prompt": "regex:[\\>\\#]",
"send_command": "!/bin/bash",
"hide": false
},
{
"expected_prompt": "regex:[\\>\\#]",
"send_command": "tmsh",
"hide": false
},
{
"expected_prompt": "regex:\\S.+?\\)[\\>\\#]",
"send_command": "",
"hide": false
}
]
}
Supported Key and Combination Key Commands
On devices of some vendors, a key or combination key needs to be sent during the login process. The system supports the following types of keys or combination keys.
Note1: The system uses the square brackets [ ] to recognize a key and combination keys to send, so include the key or combination key with the square brackets during the definition.
Note2: Add + \r or - \r after a key or combination key command to tell the system whether to send the command with the Enter key.
▪+ \r: Send a command with the Enter key. For example, [Ctrl+Y, X] +\r.
▪- \r: Send a command without the Enter key. For example, [Ctrl+Y] -\r.
No. |
Key/Combination Key |
Description |
1 |
[Ctrl+Y] |
The Ctrl+Y command is sent. Y is a letter in a lower or upper case from A to Z. |
2 |
[Shift+Y] |
The Shift+Y command is sent. Y is a letter in a lower or upper case from A to Z. |
3 |
[Alt+Y ] |
The Shift+Y command is sent. Y is a letter in a lower or upper case from A to Z. |
4 |
[Ctrl+Shift+Y] |
The Ctrl+Shift+Y command is sent. Y is a letter in a lower or upper case from A to Z. |
5 |
[Ctrl+Alt+Y] |
The Ctrl+ALT+Y command is sent. Y is a letter in a lower or upper case from A to Z. |
6 |
[ Shift+Alt+Y] |
The Shift+ALT+Y command is sent. Y is a letter in a lower or upper case from A to Z. |
7 |
[Ctrl+Y, X] |
This command includes pressing the Ctrl +X combination key and then pressing the Y key separately (without holding Ctrl +X). ▪X and Y are both letters in a lower or upper case from A to Z. ▪Ctrl +Y in this case can be any type of combination keys from No.1 to No.6, such as [Ctrl+Shift+Y, X]. |
8 |
[Ctrl+Y, Ctrl+X] |
The Ctrl +Y+X command is sent. ▪X and Y are both letters in a lower or upper case from A to Z. ▪Ctrl +Y or Ctrl+X in this case can be any type of combination keys from No.1 to No.6, such as [Ctrl+Shift+Y, Ctrl+X]. |
9 |
[Esc] |
The Esc command is sent. |
10 |
[Enter] |
The Enter command is sent. |
11 |
[Space] |
The Space command is sent. |
12 |
[Y] |
The Y command is sent. Y is a letter in a lower or upper case from A to Z. |
13 |
[Ctrl+\]] |
The Ctrl+] command is sent. Because the system uses [ ] to include a key or combination key, to avoid the conflict of the ] character, the escape character \ is used. |
See also: