Manage Automation
Once any of the automation intent (listed and described in this topic) is added, it becomes searchable and understandable by the AI. To help the AI understand the purpose and usage, the following data is included in the intent for effective use during troubleshooting:
- Intent name, Description, Tags (you can modify these properties. For more details, see Customize Automation Definition).
- Input variables, commands
- Configured diagnosis messages and Configured status codes
Golden Intent
Golden Intents are automatically embedded when they are published. When you install the built-in automation library provided by the system, all included Golden Intents are added as well. If you want to customize the description or tags without modifying the original Golden Intent, you can update the details directly in the Deep Diagnosis Manager.
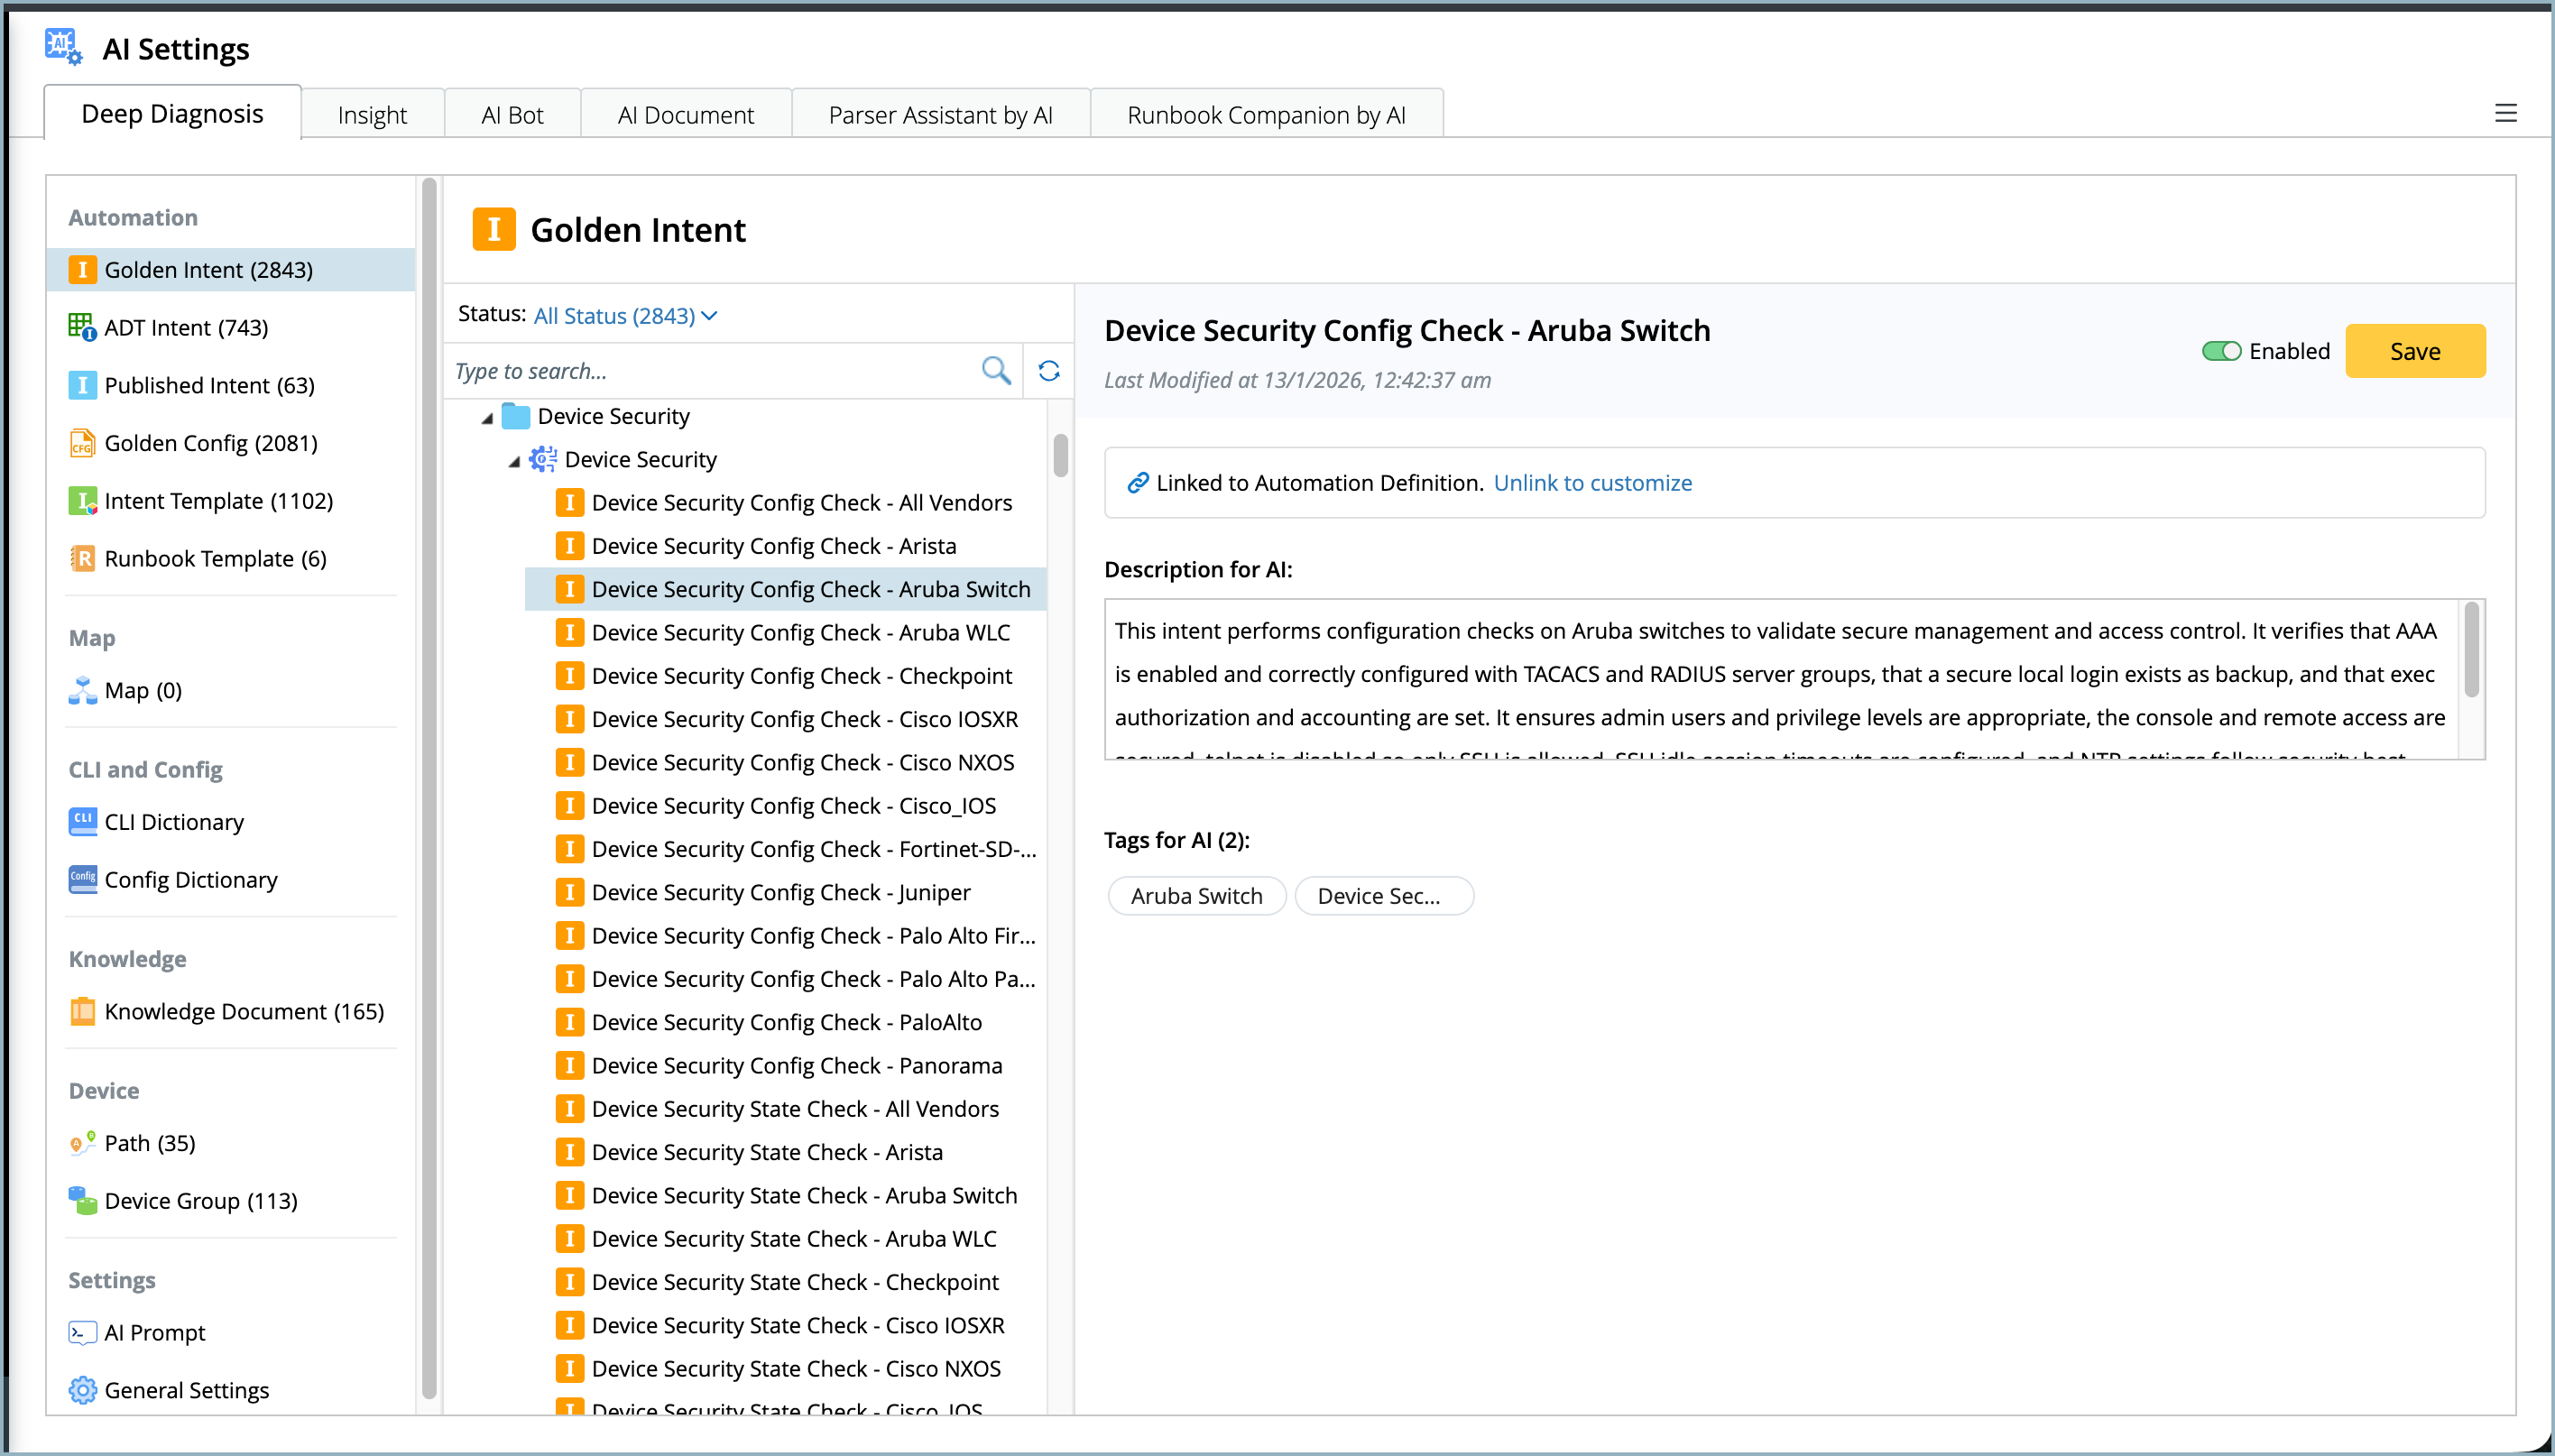
Only the seed intents are added to the Deep diagnosis manager avoiding its cloned intents. As a result, diagnosis messages and status codes are not generated at execution time. Instead, they are configured in the intent definition. When a seed intent is matched during diagnosis:
- The AI identifies the related cloned intents on the target device and uses them for reasoning.
- If the seed intent defines task variables, these variables are also added as input variables. The AI attempts to extract their values from the user’s input and applies them during cloned intent execution.
By default, the Golden Intent’s original description and tags are used for embedding. If you want to customize the embedded description or tags without modifying the original Golden Intent, you can update the details directly in the Deep Diagnosis Manager.
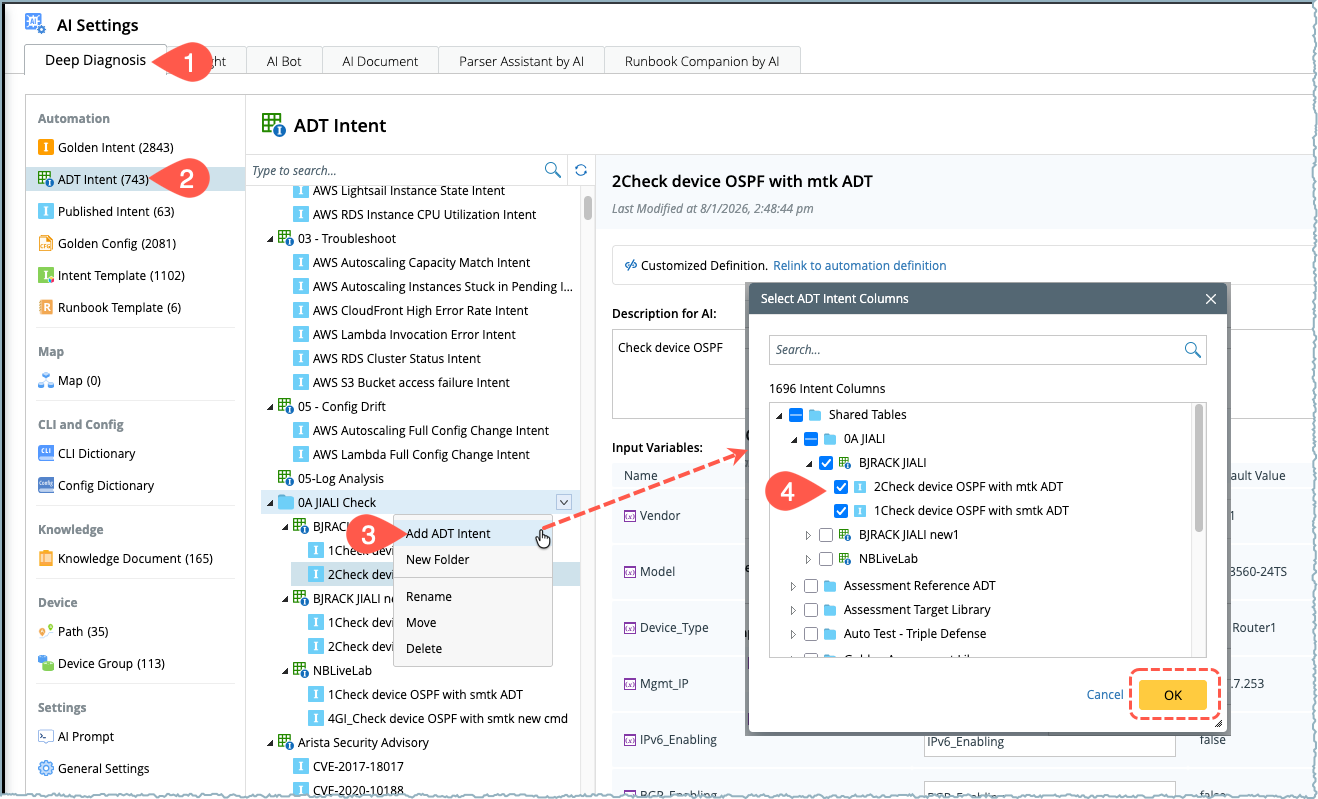
ADT Intent
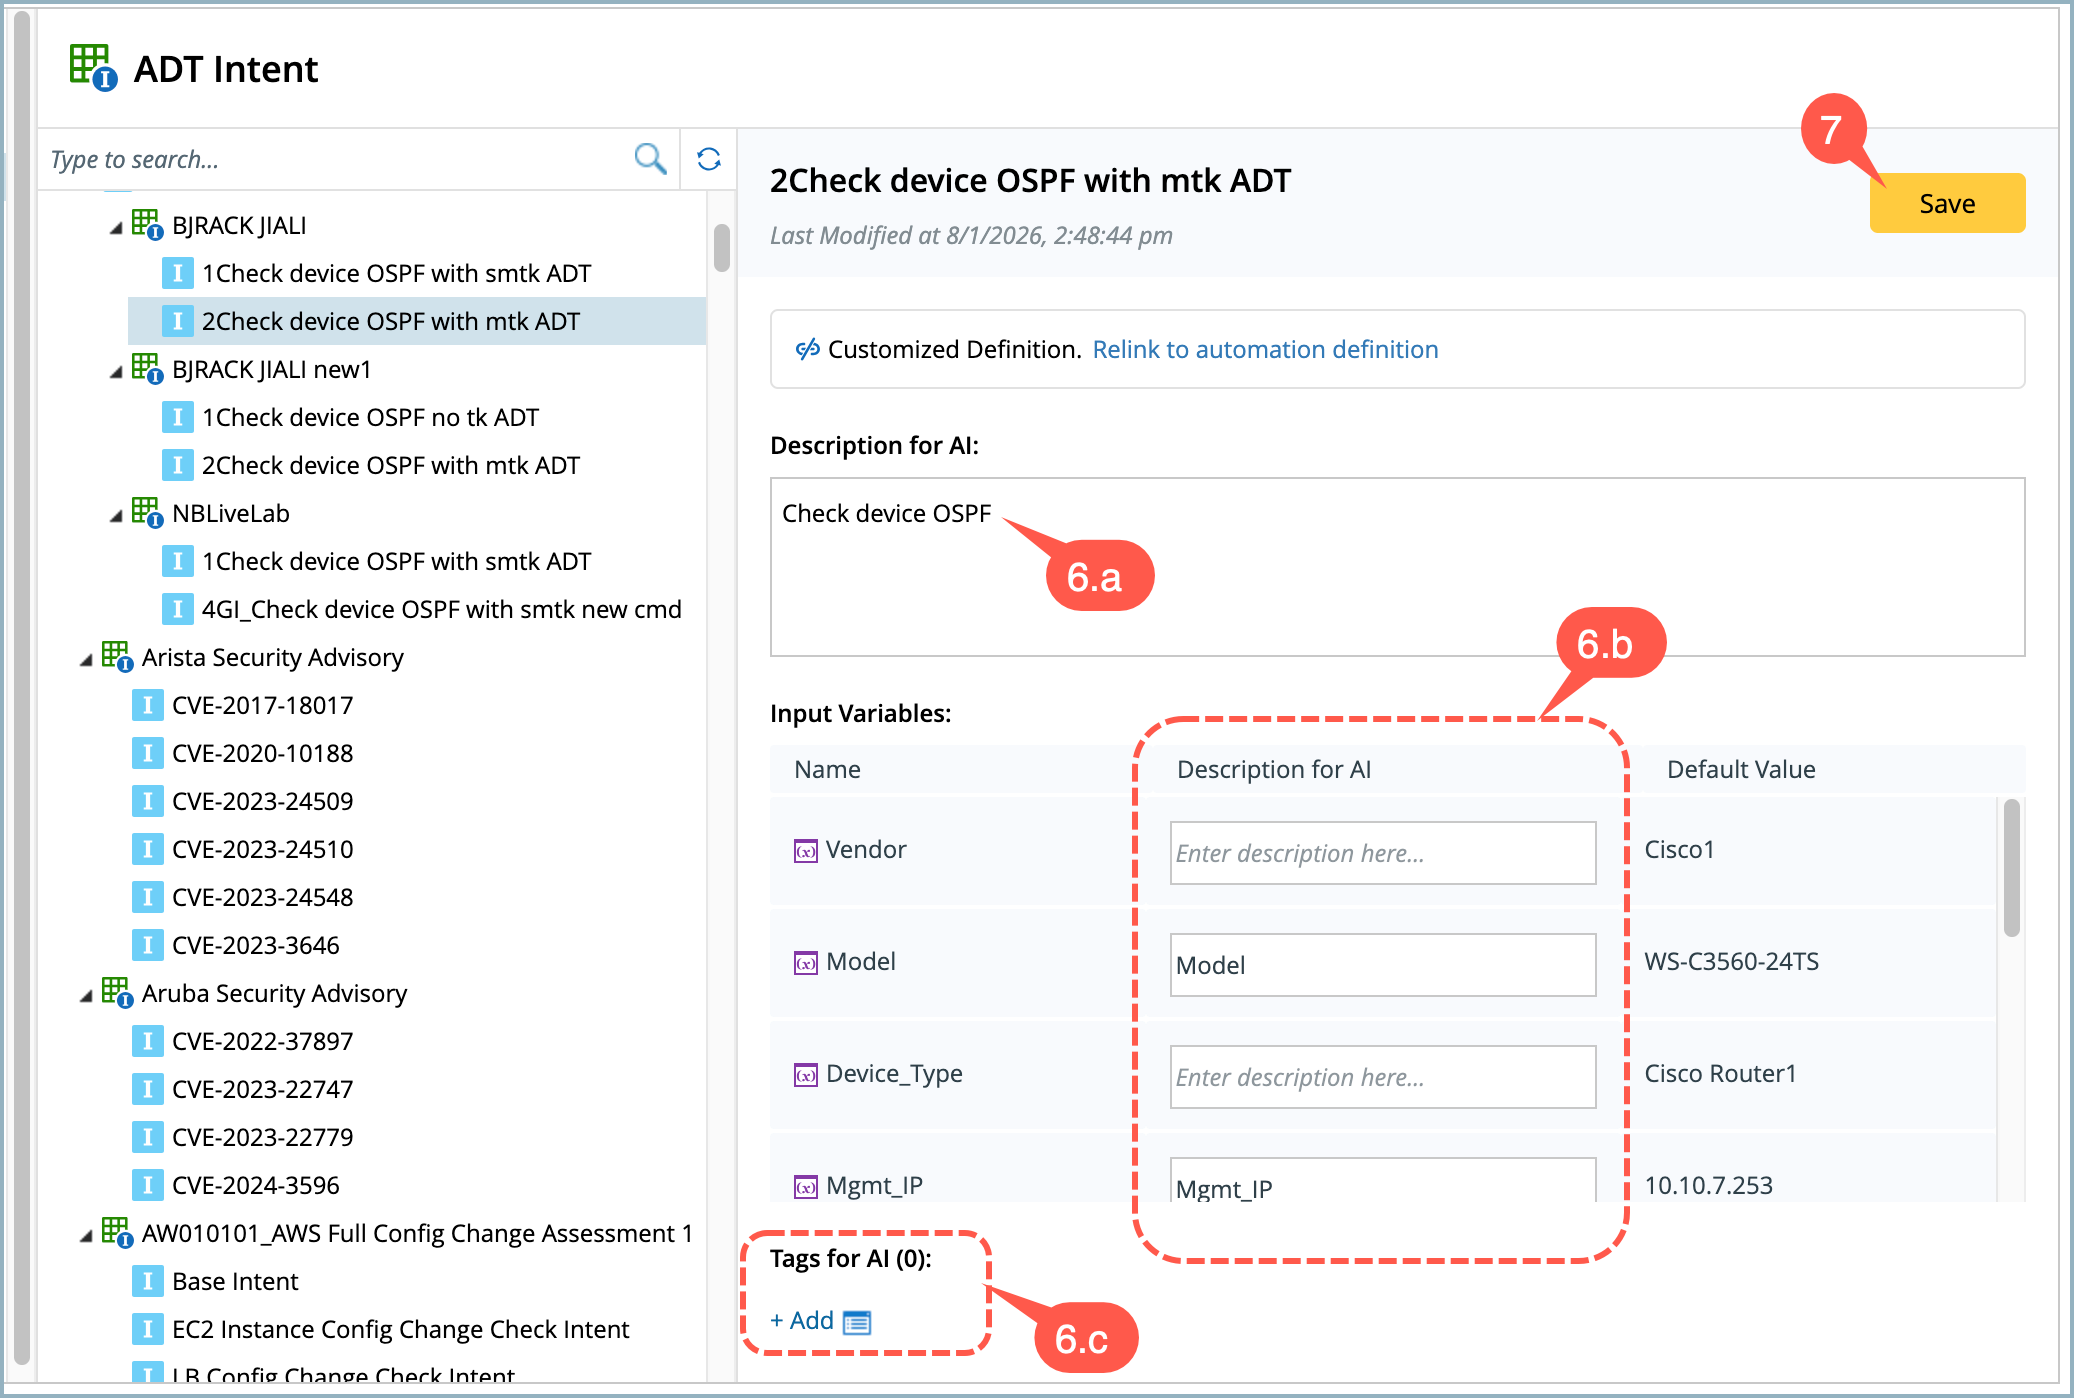
ADT intents are not added automatically. You have to manually select the ADT intent column to be included. Once they are added, their behavior is same as the golden intents. The Description, Tags and Input variables of the ADT intent can be modified as and when needed.
To add an ADT intent to the database:
-
Go to AI Settings > Deep Diagnosis.
-
Select ADT Intent from the left navigation pane. The details will appear on the right.
-
Choose a folder's drop down menu and select Add ADT Intent.
-
Tick the selection boxes of the required intent columns and click OK. The selected intents will appear in the deep diagnosis database.
-
If the input variables are configured during the intent creation, they will appear on the right side of the pane.
-
To help the AI understand the purpose and usage of the ADT intent, define the following fields:
- Description of the intent,
- Input Variables description, and
- Tags.
-
Click Save to save in the database.
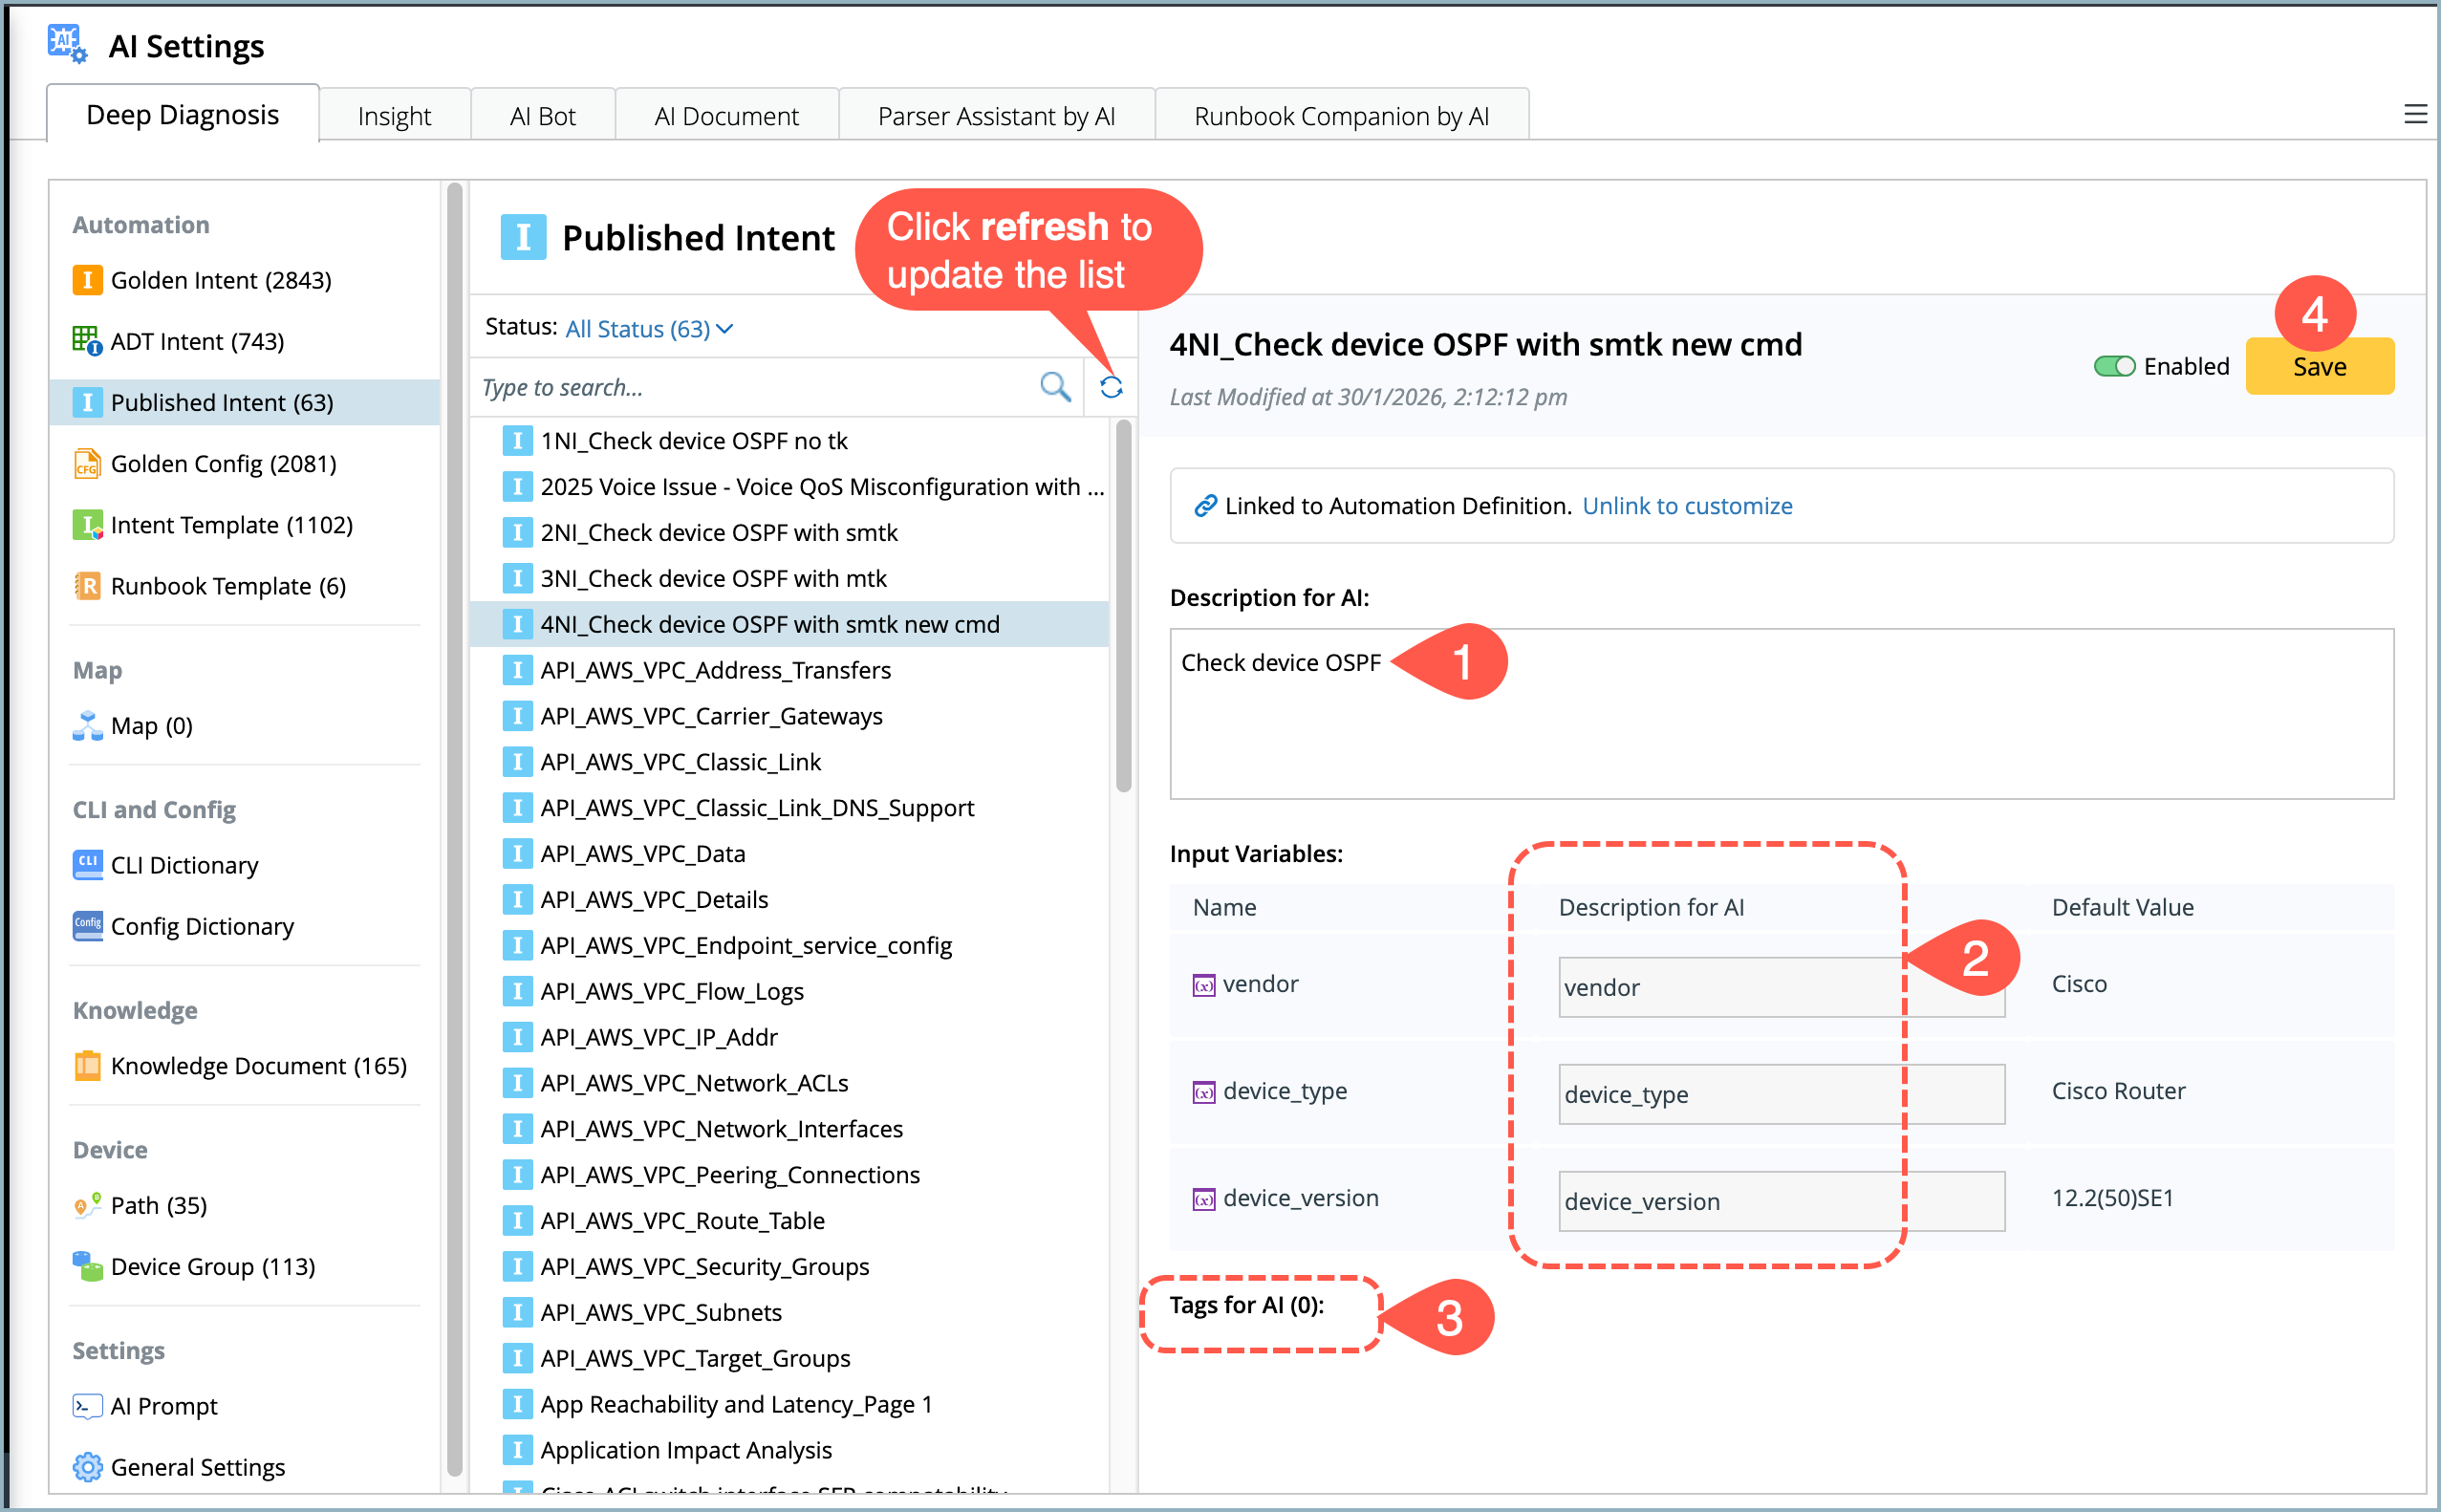
Published Intent
Published intents are updated automatically in the Deep diagnosis database. A published intent is not an intent template replicated per device, it represents a specific intent instance. As a result, the associated device, generated diagnosis messages, and status codes are directly used while adding it to the database and made available to deep diagnosis.
To make newly published available immediately, click the refresh  icon. You can manually define the following details of the intent to help the AI understand the purpose and usage of the ADT intent, define the following fields:
- Description of the intent,
- Input Variables description, and
- Tags,
- Click Save to save in the database.
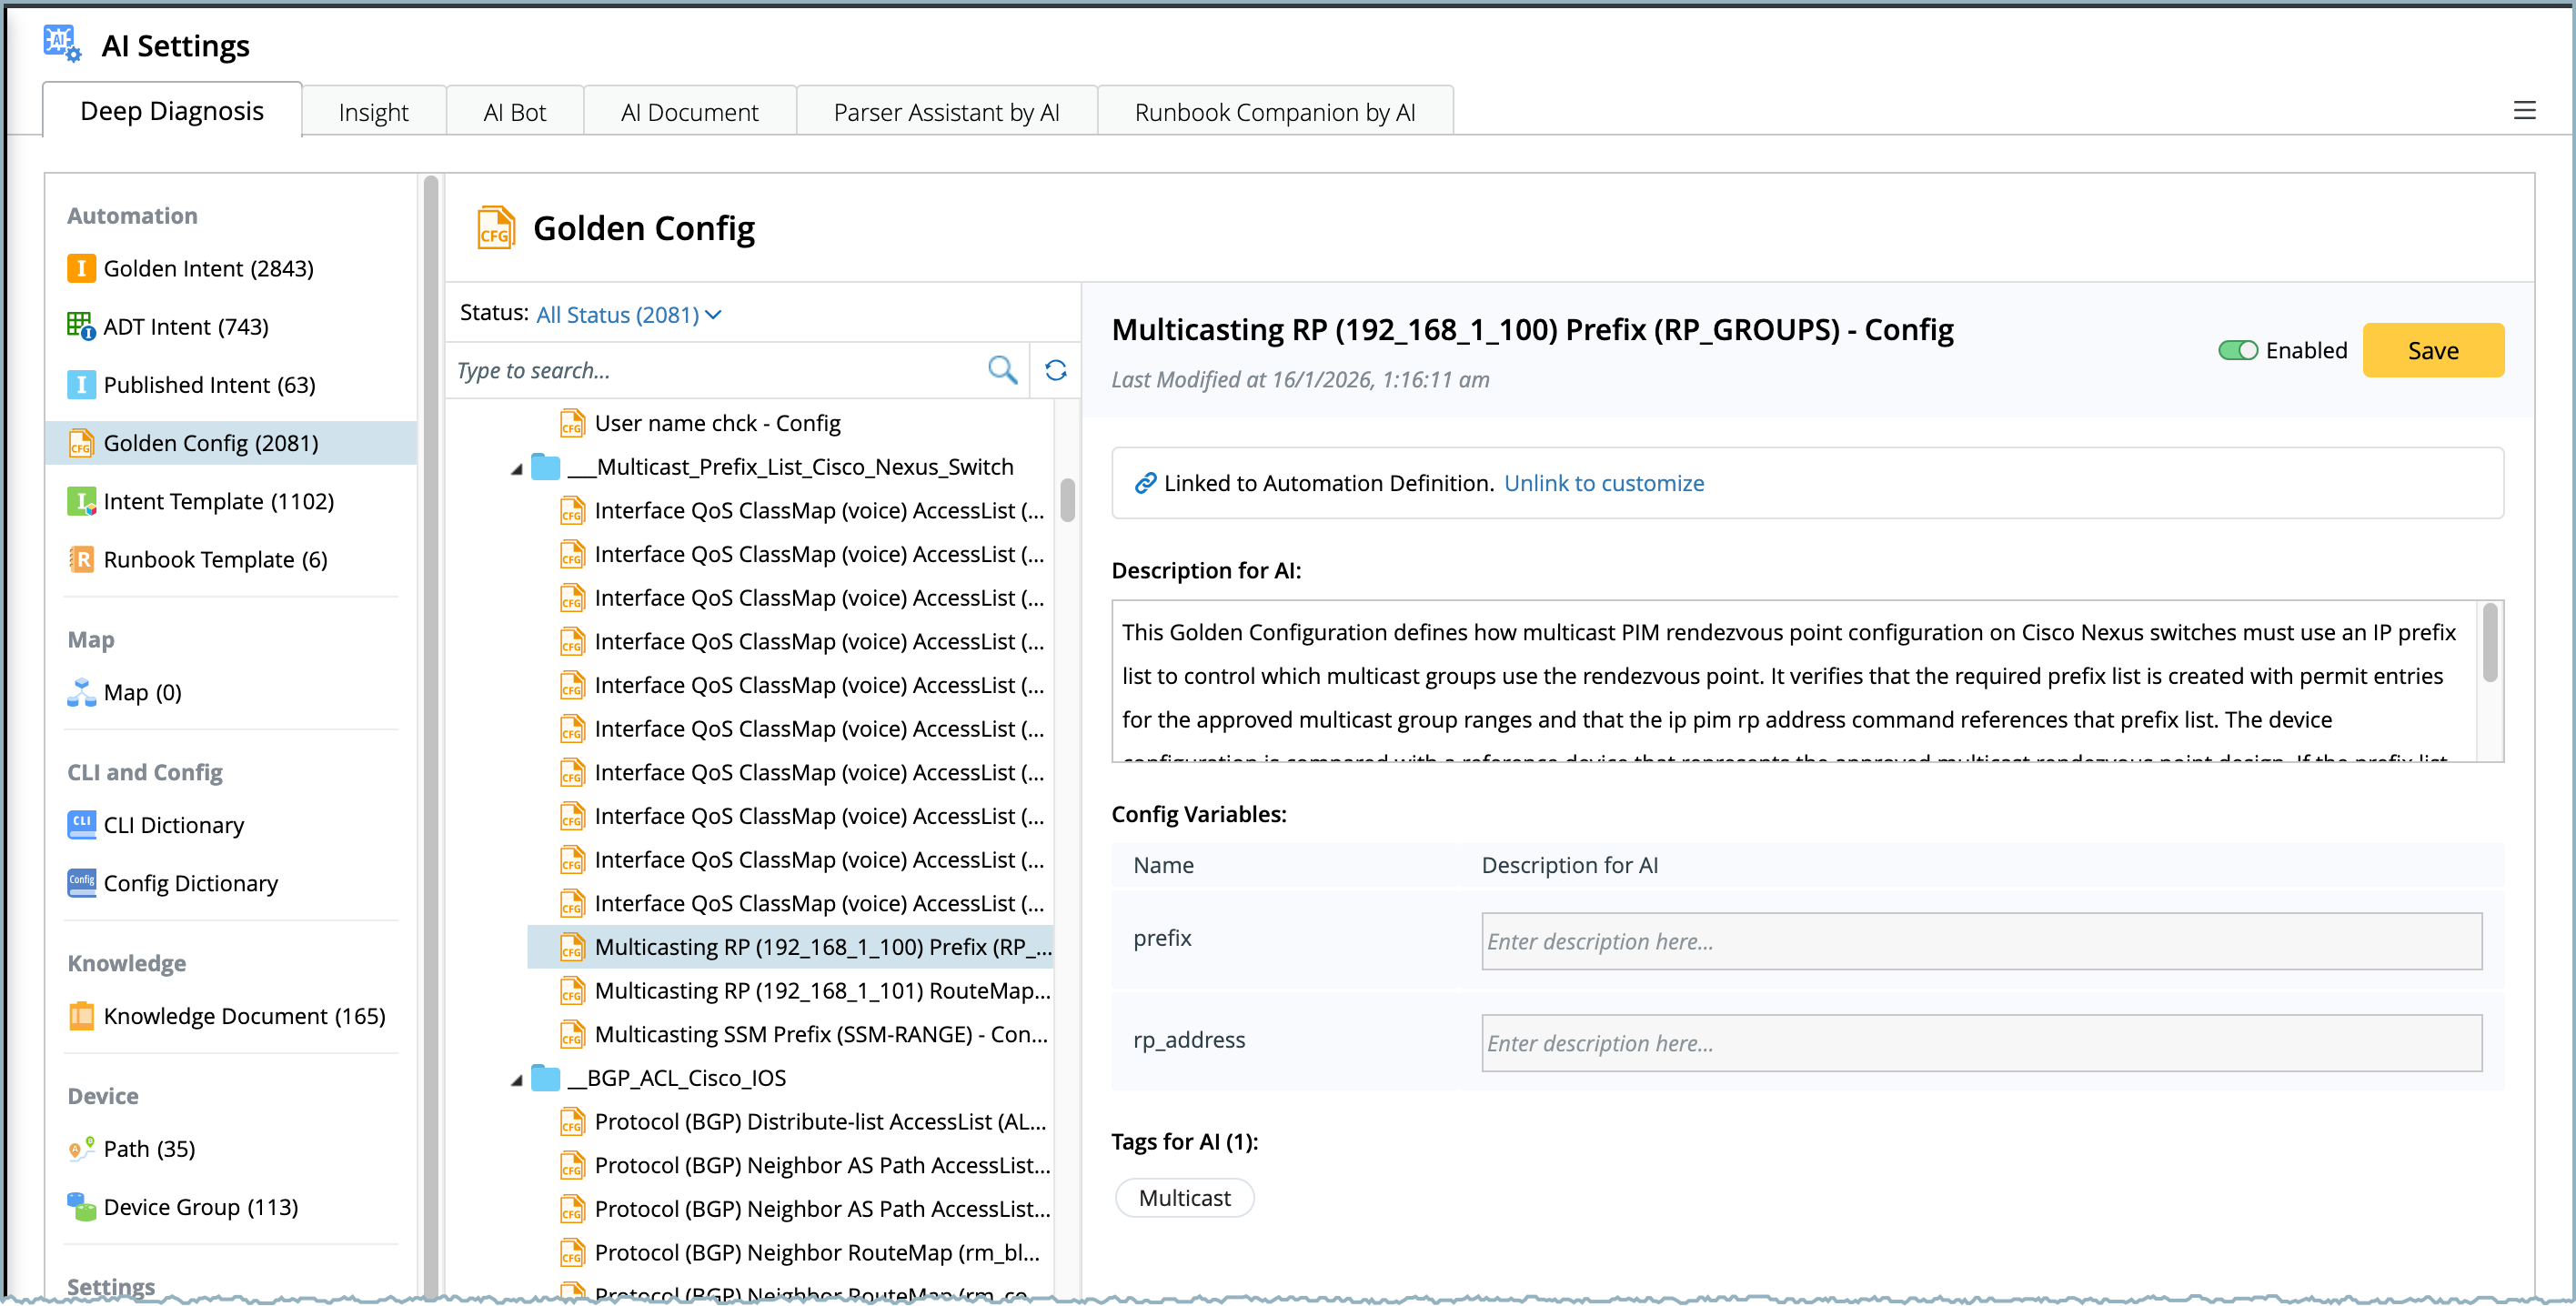
Golden Config
Golden Configs are added automatically to the Deep diagnosis when valid results are available. The information includes the rule name, Golden Config name, description, configuration variables, tags, and results.
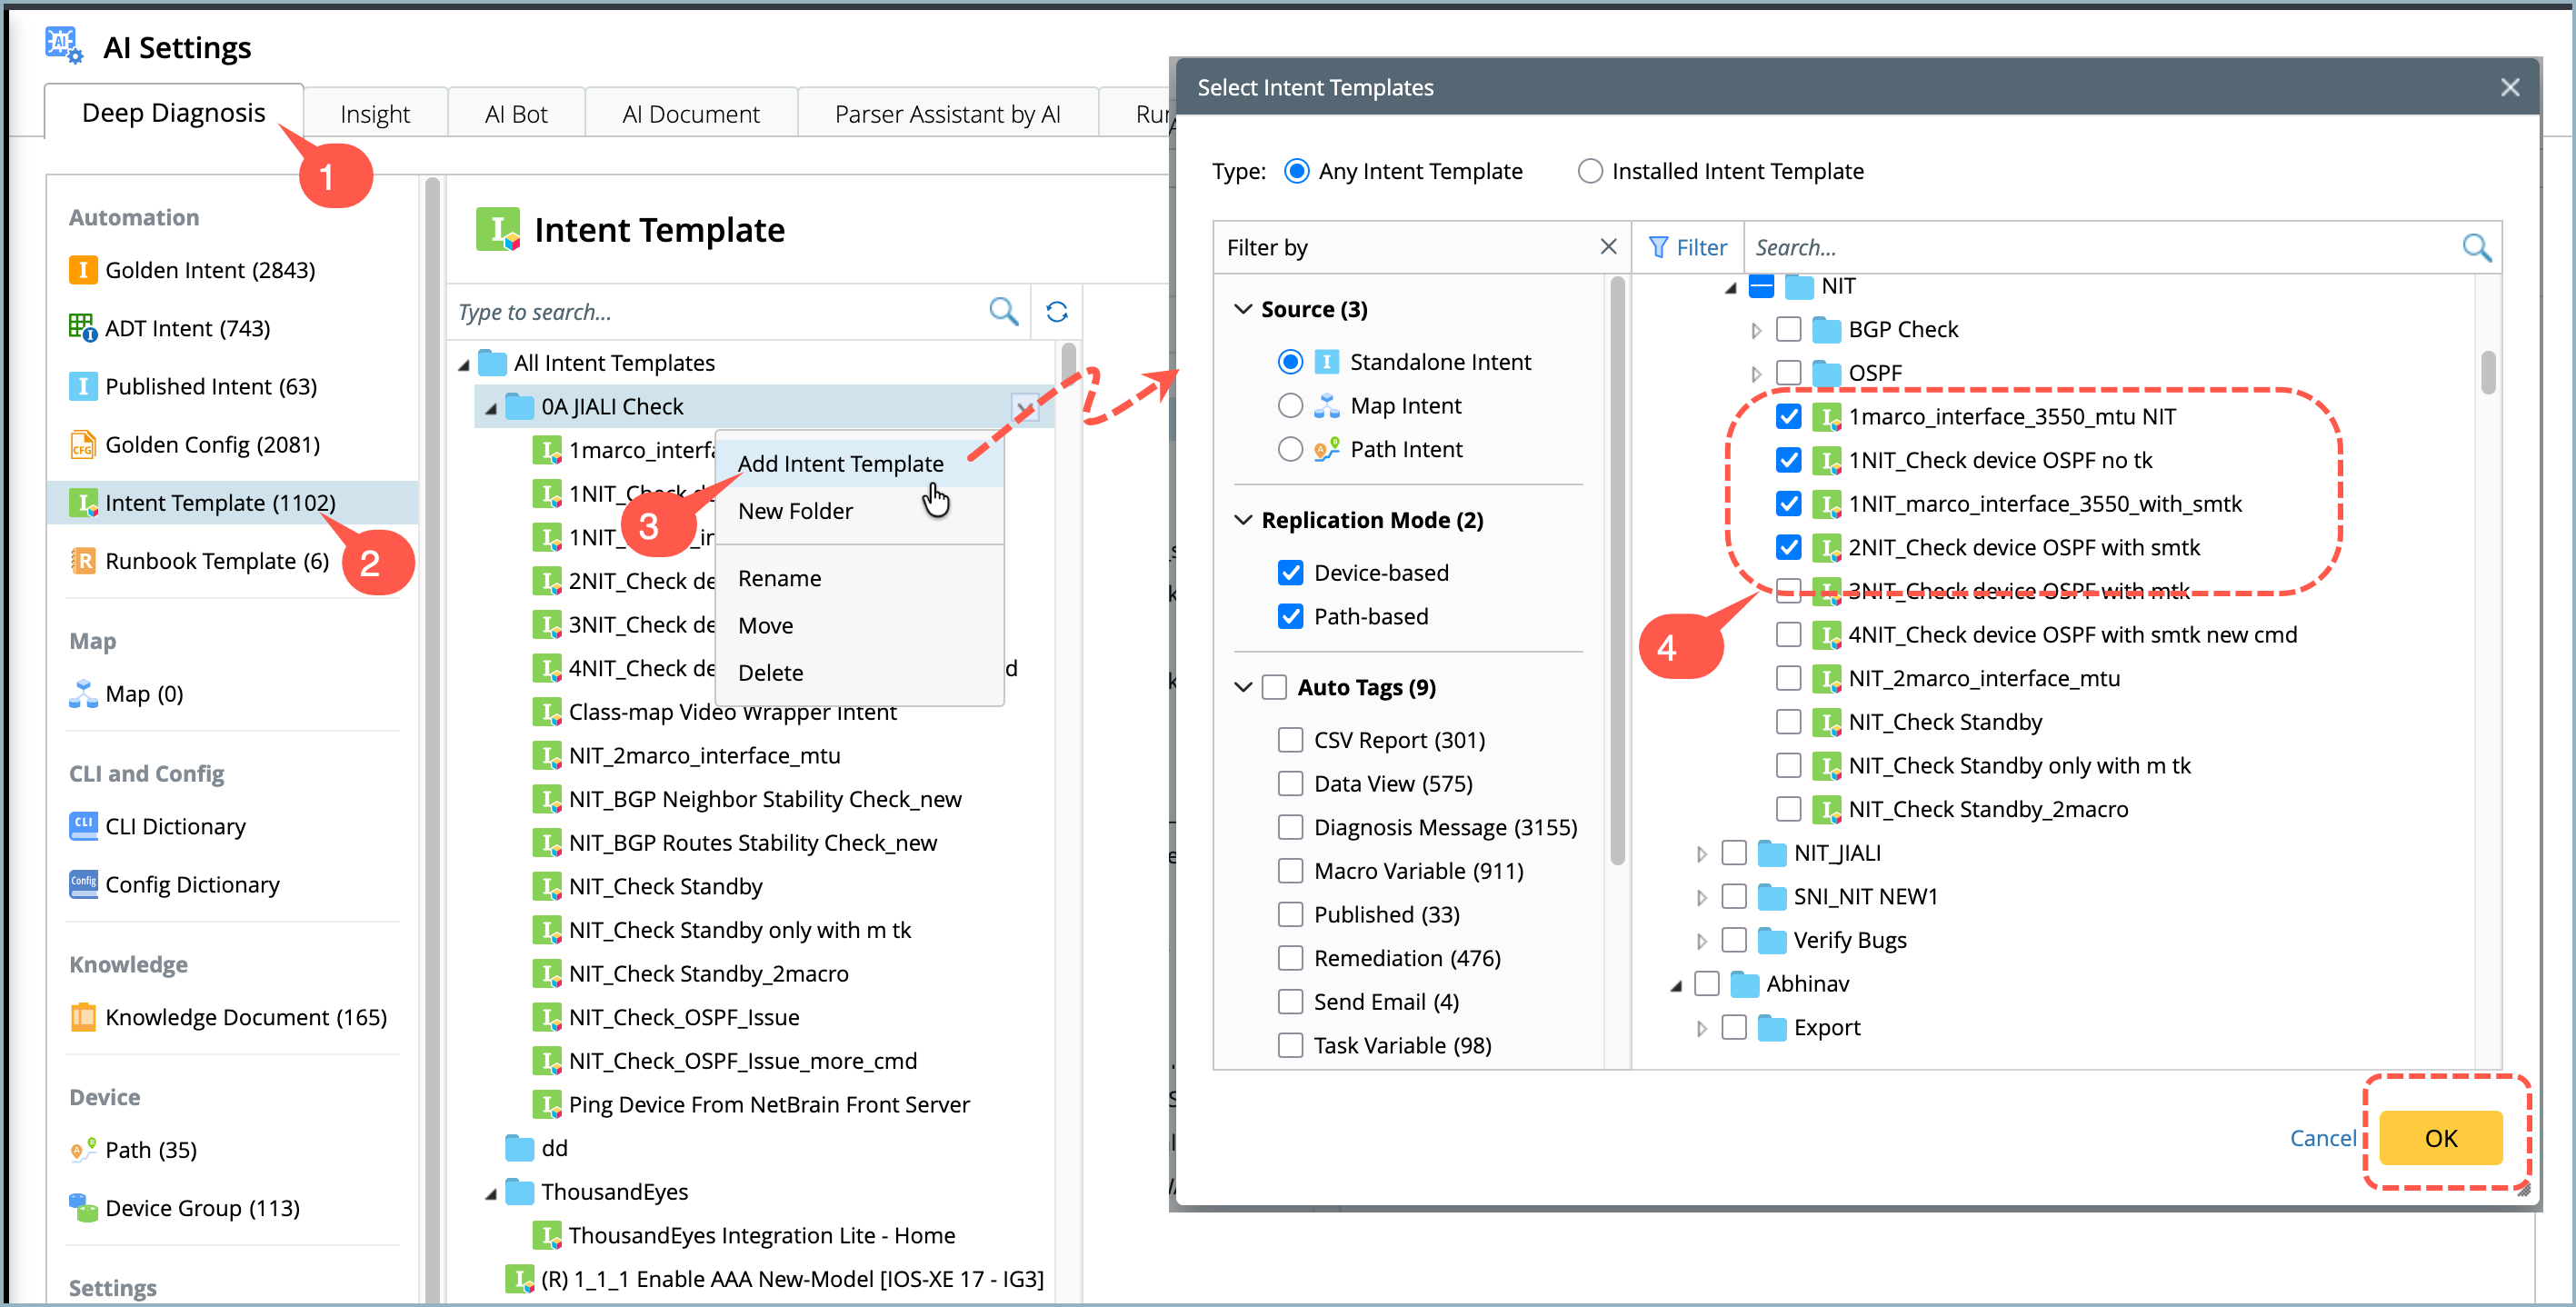
Intent Template
Intent Templates are not added automatically, you have to manually select and add them to the Deep diagnosis manager. The metadata follows the same requirements as Golden Intents.
During the reasoning process, an intent will be replicated from an Intent Template to verify checkpoints. This behavior differs from Golden Intents, which are embedded and reasoned on seed intents rather than being replicated at runtime. To add intent templates to the database:
- Go to AI Settings > Deep Diagnosis.
- Select Intent Template from the left navigation pane. The details will appear on the right.
- Choose a folder's drop down menu and select Add Intent Template.
- Tick the selection boxes of the required intent templates and click OK. The selected templates will appear in the deep diagnosis database.
- If the input variables are configured, they will appear on the right side of the pane.
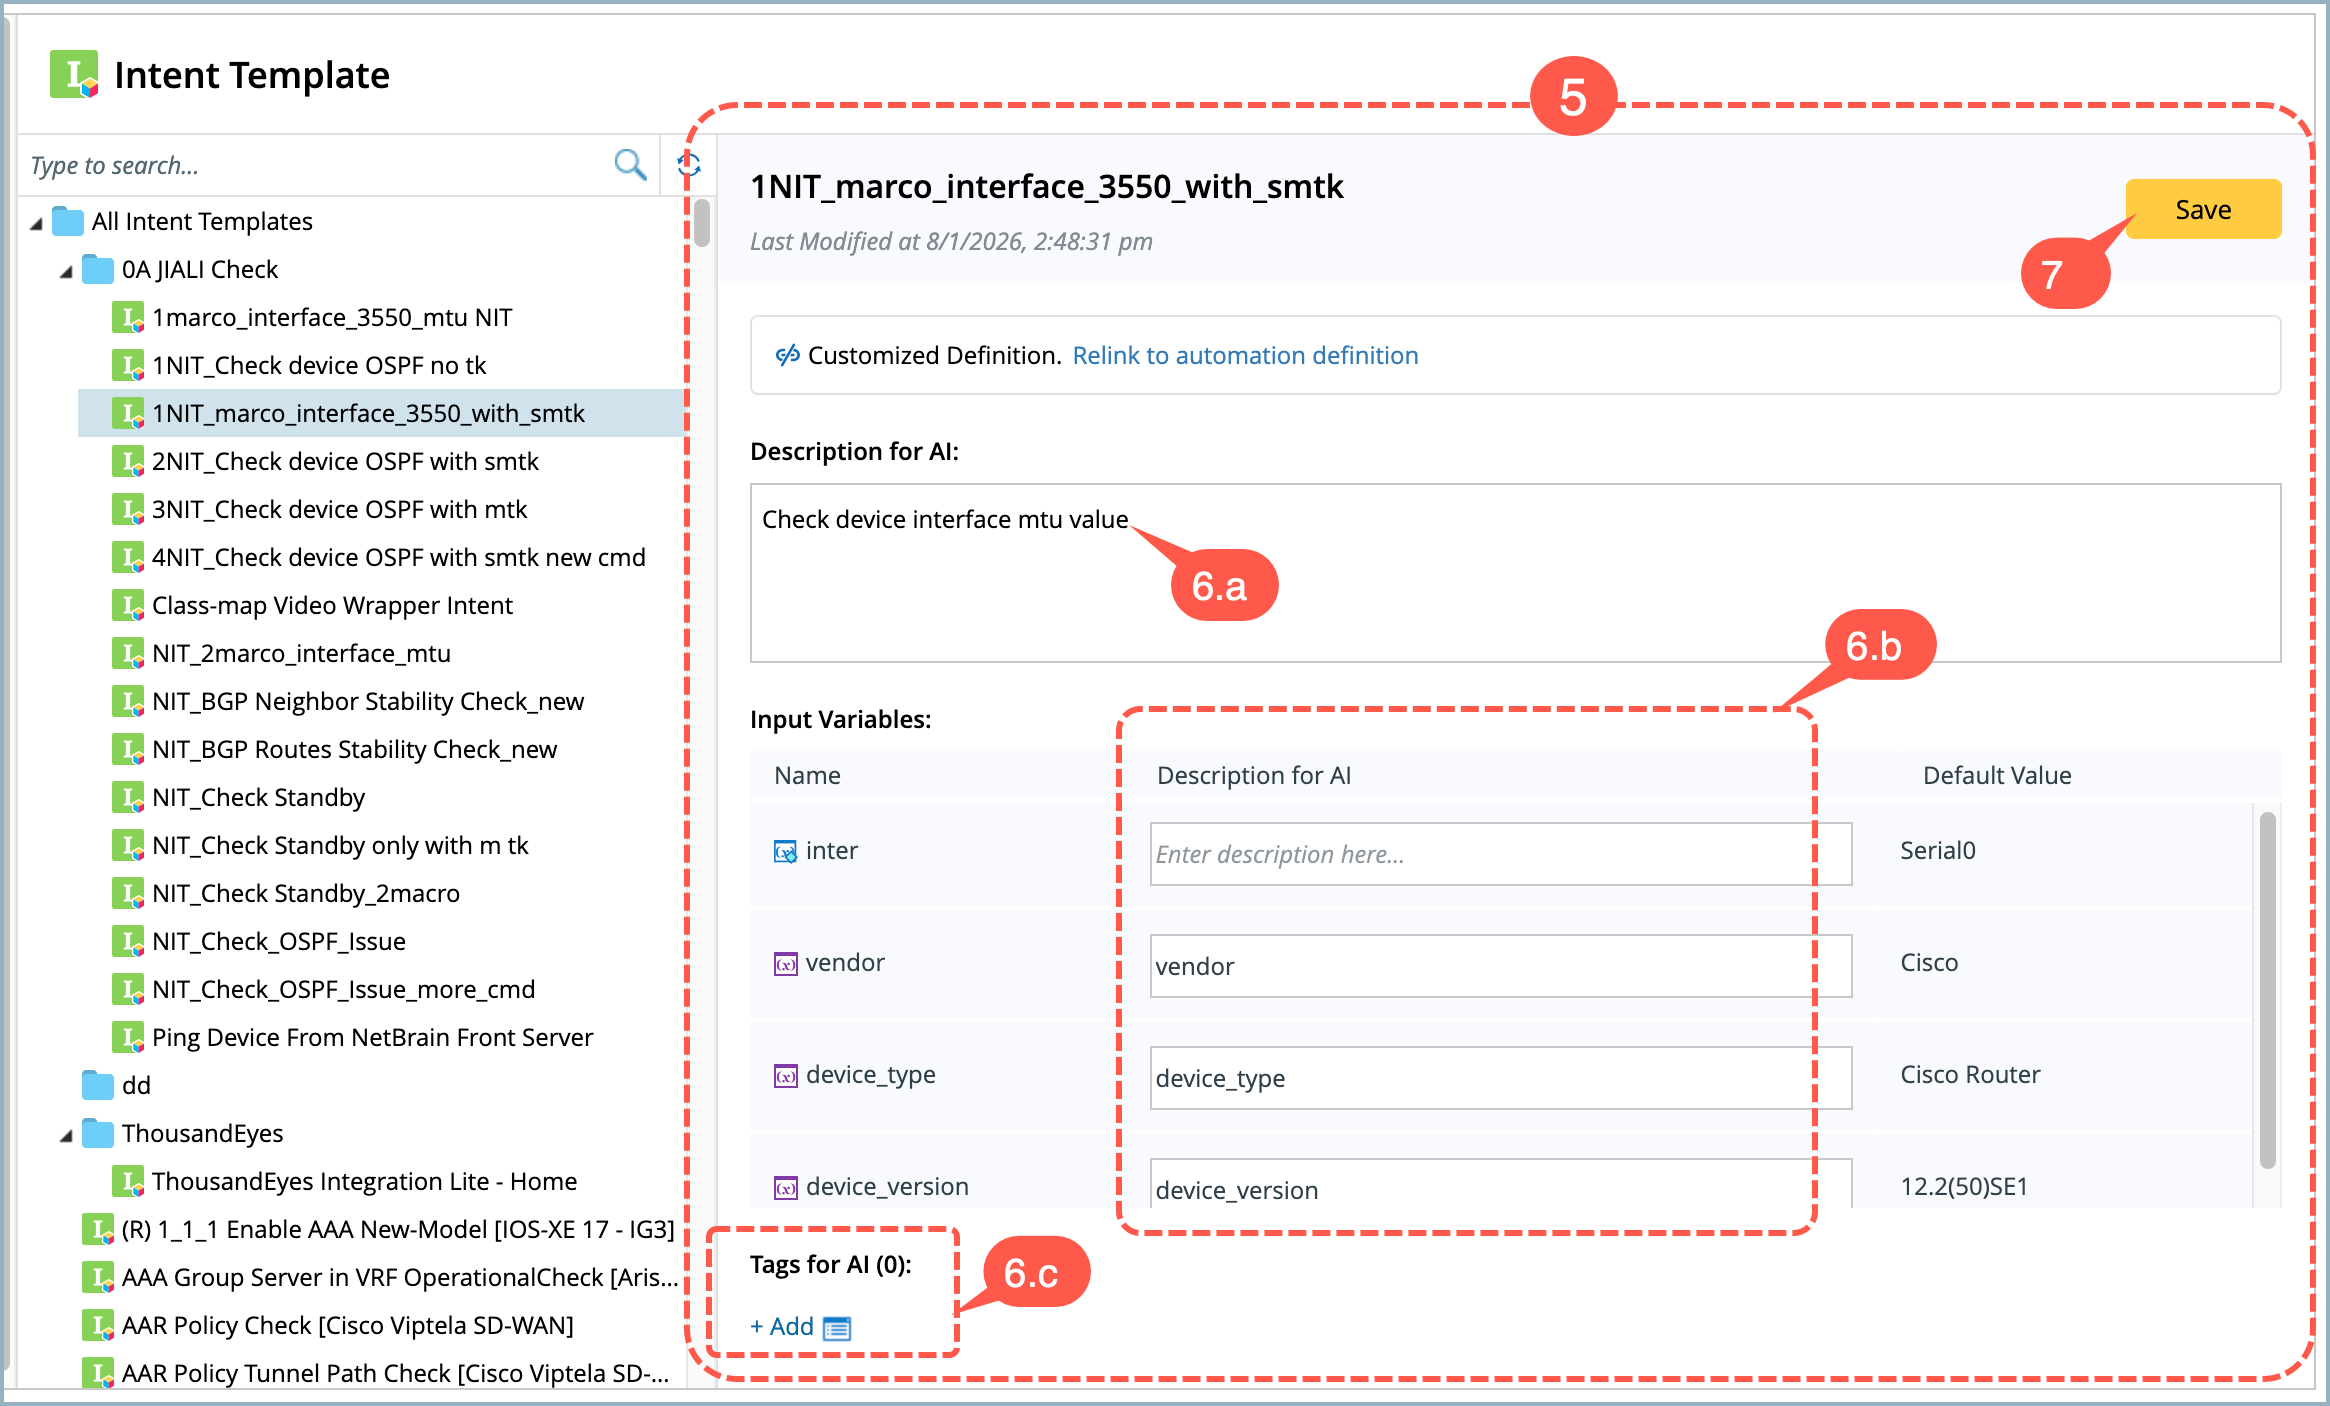
-
To help the AI understand the purpose and usage of the intent template, define the following fields:
- Description of the intent template
- Input Variables description, and
- Tags.
- Click Save to save in the database.
Runbook Template
Runbook Templates are not embedded automatically. Users must manually select and add the them. The runbook metadata includes the name, description, tags, full folder path, and input variables.
During the reasoning process, a Runbook is generated from the matched Runbook Template. Deep Diagnosis supports single execution only. The included Execute CLI node, Ping node, Traceroute node, NI node, configlet node, compare node, and retrieved live data can be executed once.
Other Runbook nodes may be included in the generated Runbook, but they are not executed by Deep Diagnosis. You can control which Runbook nodes are allowed for Deep Diagnosis execution in the Deep Diagnosis Manager settings.
To add runbook templates to the database:
- Go to AI Settings > Deep Diagnosis.
- Select Runbook Template from the left navigation pane. The details will appear on the right.
- Choose a folder's drop down menu and select Add Runbook Template.
-
Tick the selection boxes of the required runbook templates and click OK. The selected templates will appear in the deep diagnosis database.
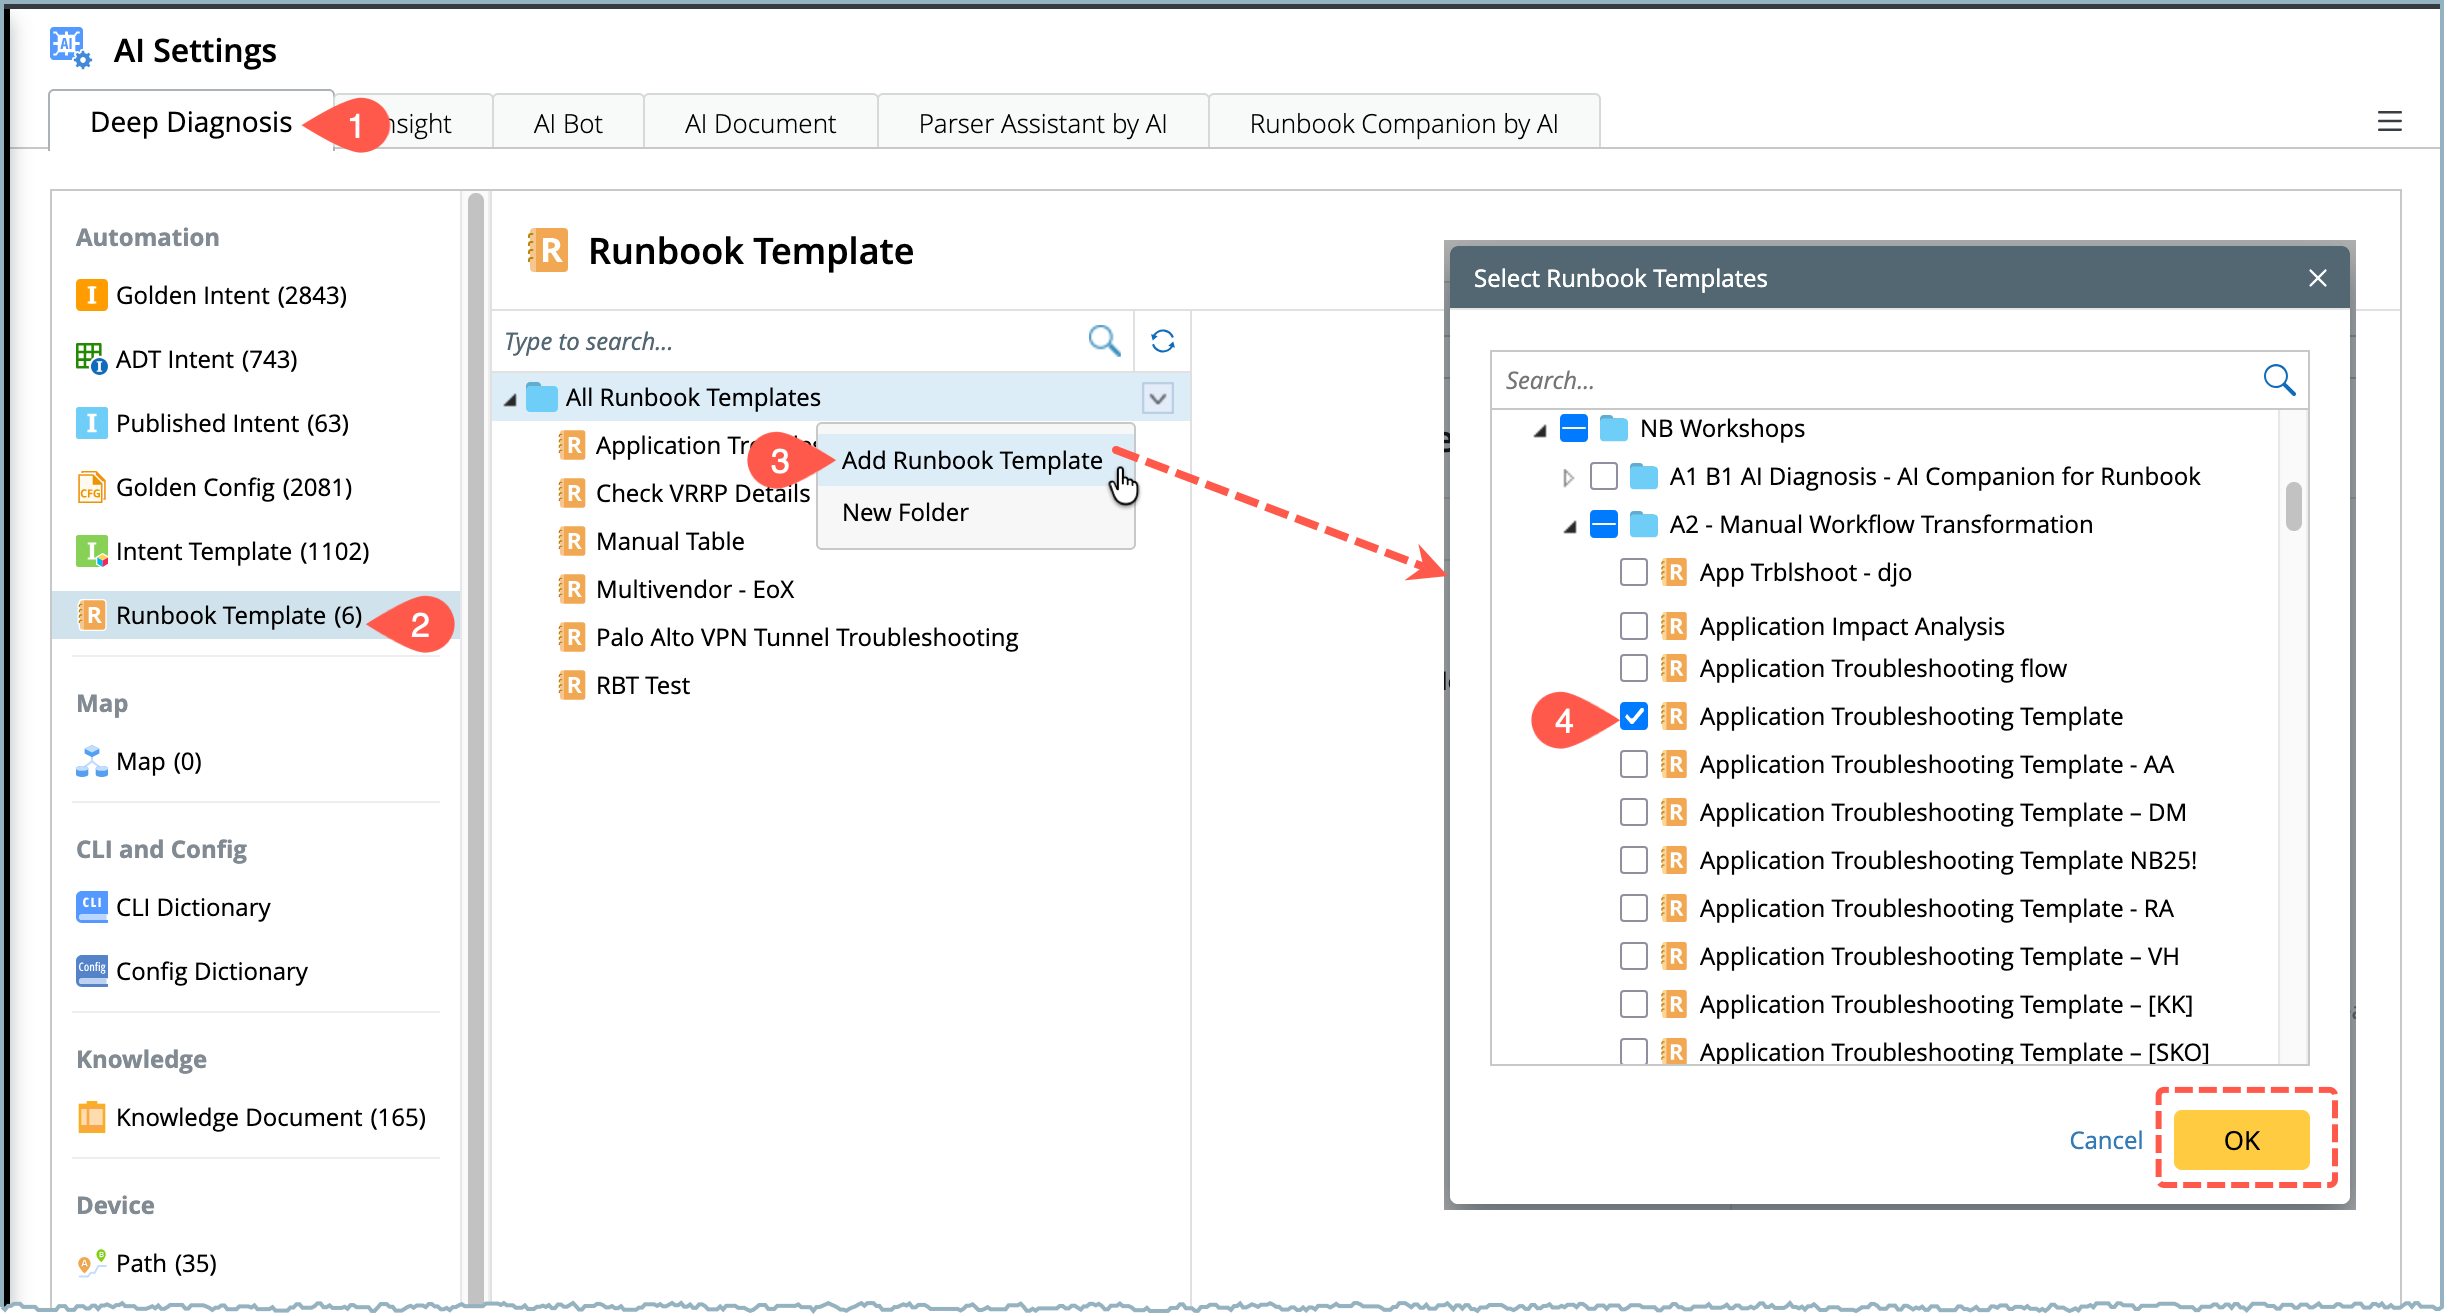
- If the input variables are configured in the runbook, they will appear on the right side of the pane.
-
To help the AI understand the purpose and usage of the runbook, define the following fields:
- Description of the runbook,
- Input Variables description,
- Runbook Nodes: Select the applicable nodes defined in the runbook,
- Tags.
-
Click Save to save in the database.
